SRGN Blog

Components of a Sneaker

By Anna Sork

Components of a Sneaker

Here's a quick cheat-sheet on the anatomy of a sneaker.

NOTE: Some of these terms are interchangeable and can vary from person to person or shoe to shoe. But these are the terms that we use in our studio.

EXTERIOR COMPONENTS:
  1. SHOE LACES: Fastens and keeps your foot secure in the shoe.
  2. TONGUE: Protects the top of the foot and prevents laces from rubbing against the foot.
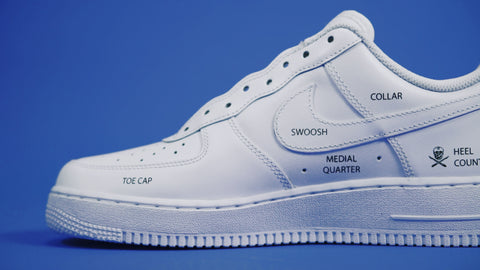
  3. TOE BOX: Sometimes referred to as a "vamp". This is the part of the shoe that covers and protects the toes. Usually has perforation for breathability.
  4. TOE CAP: Sometimes referred to as a "Mud Guard" - Adds strength and structure to the upper front of the shoe and gives additional protection to the tips of your toes.
  5. QUARTERS (MEDIAL / LATERAL): Helps keep your foot secure inside of the shoe. 
  6. OUTER HEEL COUNTER: Provides stability and protection.
  7. COLLAR: Connects to the upper part of the eyelet row to make the shoe conform to the shape of the foot. Most times the collar will have foam or soft material inside, wrapping just below the ankle to give a snug, gap-free fit.
  8. EYELET ROW: Where your laces are threaded through and adjusts the fit of the shoe.
  9. HEEL TAB: Covers the zigzag stitch that connects the medial and lateral heel counters.
  10. SWOOSHES: Branded component, also hides the zigzag stitch that connects the collar to the heel counter.
  11. HEEL COLLAR AKA "MUSTACHE": Helps secure your foot in place with the rest of the collar.
  12. MIDSOLE: Provides cushioning and shock absorption.
  13. OUTSOLE: Part of the sole that touches the ground. Usually has tread and provides traction.

INTERIOR COMPONENTS:

  1. LINING: Covers the inside seams of the shoe. This particular lining is made out of soft mesh material & ⅛ open cell foam that provides cushion and comfort, helping draw out moisture.
  2. COLLAR FOAM: Provides comfort around the ankle.
  3. HEEL COUNTER: Thermoplastic material that molds to the heel of the shoe and provides protection and support to the heel of the shoe.
  4. TOE PUFF: Thin thermoplastic material that provides structure to the front of the shoe so it doesn’t collapse and helps provide toe space.
  5. STROBEL BOARD: Flat piece of fabric used to close the shoe upper, turning it into a sock or booty which then can then be soled.
  6. INSOLE: Soft foam material that provides additional comfort.

Read more


How to Prep Your Shoes for Painting

By Anna Sork

How to Prep Your Shoes for Painting

This preparation method goes for all types of paint applications – whether you are hand painting, airbrushing, or using paint pens, you’re going to want to prepare your shoe this same way for the best results.

Tools/Supplies:

  • A pair of sneakers 
  • Clean rag/cotton balls/ old shirt/sock (Must be clean)
  • Acetone/paint thinner/nail polish remover/rubbing alcohol
  • Heat Gun/Blow Dryer
  • Masking Tape
  • Craft Knife
  • Surgeon Creator Studio Premium Paint Pens
  • Stencil (Optional)

Preparation:

Let’s start prepping this shoe so we can paint a cool design after!

  • The first thing we are going to do is wipe down all areas of the shoe that will be painted on with acetone. This is to clean and remove the factory finish of your shoes so the paint will adhere to the material and last longer. 

  • Now that the shoe is clean and the factory finish is gone, start masking off the areas you want to keep paintless. You’ll need your roll of masking tape and craft knife for this step. 

  • We like to use a lot of tape to make sure the surfaces we want to keep clean are completely covered. Then, use the craft knife to help outline smaller areas, such as the swoosh, and cut away all the unwanted tape.
  • Pro tip: It helps to have a rough idea of what you are going to paint on your sneakers before this step, so you can really take advantage of masking the shoe off. It will save you time and make your life easier once it is time to paint.

Painting:


  • It’s important to note that it may take several layers of paint to get sold color results.
  • There is no set number of layers. However, you should keep applying layers of paint until the color is solid and no streaks appear on the surface. Usually, you need at least 2-3 layers to achieve a solid color on the surface you are painting.
  • When adding a finish, whether it’s matte, glossy, or satin, it is best to apply even light coats and let them dry completely in between coats so you can see the full effect the finish has on your paint. Applying too much of a finish can change the colors of your paints slightly, making them darker or lighter than you intended.
  • Use the heat gun to dry your painted surface. This allows us to speed up the drying process and apply as many layers as needed. The heat also helps set the paint.

  • And now you have your painted sneaker!

  • In case you made any mistakes, use acetone and q-tips or a rag to gently wipe away paint mistakes. Make sure the surface is completely dry before attempting to paint it again.

Watch the full tutorial below.

 Follow our Instagram for more customization tutorials.

Read more


How to Customize Your Own Sneakers

By Anna Sork

How to Customize Your Own Sneakers

Here are three customization techniques you can use to take a pair of sneakers and turn them into your own.  

Paint Your Sneakers

Painting is a great technique to turn your sneakers into a one-of-one design. Whether you want to take a freeform approach, or use stencils or customization kits to assist in the process, your shoes are the perfect canvas to bring your masterpiece to life. Simply purchase a pair of sneakers (we recommend an all-white colorway to start with a blank canvas) and paints, and start creating. 

Make sure to prep your sneakers before you begin by following the steps below.

Sneaker Deconstruction / Reconstruction

Sneaker deconstruction and reconstruction is more invasive process – in which you fully rebuild your sneaker upper with new materials following the original silhouette pattern, while keeping the sole from your base shoes in tact. This technique gives you an entirely new design of your favorite silhouette – reconstructed by hand.

Check out The Shoe Surgeon's upcoming deconstruction / reconstruction courses to learn the entire process from start to finish.

The Shoe Surgeon Class

Swap Your Sneaker Soles

Sole swapping is a popular sneaker customization technique, taking the upper of an existing pair of shoes and swapping it with the soles of another pair. This process can be challenging to master, but with the proper tools and guidance you can achieve your favorite mash-up design. Check out our tutorial below for the step-by-step process.

Want to learn more about sneaker customization? Follow our Instagram for more tutorials and upcoming courses.

Read more

Recent Articles